Metal Repousse Masks
This slideshow requires JavaScript.
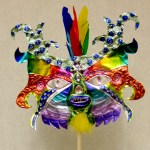
The term “repousse” means “to push out” in French and refers to the metal tooling technique used on these masks. The goals of this lesson were to tool the metal from both the front and the back, to create a mask that showed
symmetry, and to show a variety of patterns and designs. Students were given pattern references and shown masks from different cultures for inspiration, but were also free to design their mask based on an animal or their own imagination. The color was done with Sharpies, and students were encouraged to try advanced color techniques such as blending and fading with analogous colors and layering with contrasting colors. Final decoration choices included beads, buttons, feathers, wire, pipe cleaners and raffia. The importance of good craftsmanship was discussed as means of presenting the most effective finished product.


Mar 05, 2012 @ 08:03:09
These are very creative. What age level did you do these with?
Mar 05, 2012 @ 22:45:31
All the work you see on my site is done by 7th graders. For this mask project, I use 36 gauge aluminum tooling foil. I have the kids work out the design on copy paper first: (fold in half and do a “half face”, then trace on a light table to complete the symmetry.) Tape the completed paper design to the foil, and use a ballpoint pen to transfer the design. (work over felt pads or a stack of newspaper so the foil can emboss.) The pattern work was all done free hand directly on the metal, after removing the paper, with a dull pencil. Color with Sharpies and adorn with beads, wire, etc!
Apr 05, 2019 @ 10:41:17
It’s beautiful! How did you cut the shapes of the masks?
Apr 05, 2019 @ 19:14:14
Regular old scissors! 🙂 The tooling foil is 36 gauge aluminum. very bendable and easy to cut. (but stiffer than what you wrap a sandwich in!)
Jul 10, 2021 @ 09:13:24
What do you use for your clouring
Jul 10, 2021 @ 18:00:15
We use colored Sharpies (permanent markers) for the color!
Mar 15, 2023 @ 01:15:22
How do you attach the beads/feathers/raffia in the back? And do you attach them to a dowel? If so, how? Thanks so much!
Mar 15, 2023 @ 03:53:28
Everything is attached on the back with hot glue!
Aug 16, 2023 @ 20:55:33
How many 45 minute class periods does this typically take?
Aug 16, 2023 @ 21:09:58
Probably 6-7. 1-2 to draw design. 3-4 to transfer, emboss and color. (assemble/paint stand in between. I have a station and cycle kids through.) The stand is a 12″ section of dowel glued in a scrap wood base. Final day to attach/embellish. Look at this lesson to see more detailed info on transfering to the metal! https://amslerartroom.com/student-work/jeweled-bugs/
Aug 16, 2023 @ 21:16:54
Thank you!