Juxtaposition Mixed Media Collages
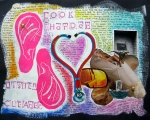
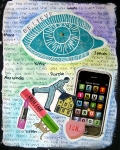
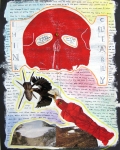
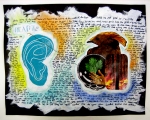
We learned how Surrealist artists like Salvador Dali created interesting and dynamic works of art by juxtaposing seemingly random types of imagery. We used a variety of media, (materials,) to create thought-provoking compositions which challenge the viewer to make visual and meaningful connections. Some of the elements of each piece include a collage of magazine pictures, a printed image of a body part, text, (both stamped and handwritten,) chalk pastel, and wire. We utilized stream of consciousness writing as a background element and were free to layer the materials in personal ways. Although structured in sequence, this lesson was much freer and had less “expected” results than many of the projects we do. The result was spontaneity and unpredicatable visual masterpieces!


Jun 05, 2018 @ 23:06:22
Your juxtaposition mixed media artwork appears to be done on a white painted surface. The edges look brushed. How did you achieve that look?
Jun 06, 2018 @ 00:46:22
We start on a piece of 18 by 24″ black paper. Using a wide, flat brush, they brush on white tempera to create a “base”. They are encouraged to leave the edges loose with visible brush strokes. This is a quick step we do at the beginning of a class, and while the paint is drying, they start looking for and cutting out their photo images in the magazines.
Jun 16, 2018 @ 10:42:29
My black paper wrinkled a good bit after applying white tempera. Did you have that problem? Also what size printing blocks did you use for body parts?
Jun 17, 2018 @ 22:30:33
I don’t have that problem, but maybe its the quality of your paper? I always by Pacon Tru_Ray construction paper which has superior color quality and a substantial, finely milled texture. It holds up well to the paint. Another thought: Maybe paint to watery?
Jun 17, 2018 @ 22:32:15
I buy the foam in 9 by 12 sheets. If kids had a large “body part”, they might need a whole sheet. I had half-size ones available for smaller designs. We work out the image on regular copy paper and transition to the foam by taping the paper to it and using a ball point pen to transfer the image.
Oct 26, 2021 @ 05:29:18
How did you get them to brainstorm the concepts they wished to represent?
Oct 27, 2021 @ 03:54:43
They didn’ brainstormt— The imagery sort of flowed after they had cut images out and started piecing them together. They sort of tell their own story, and it wasn’t really about STARTING with a concept, but more about the spontaneity of seeing what unfolded!
Dec 03, 2021 @ 00:21:48
I am thinking of doing this as an 8th science teacher with students tracing the path of light through the eye and how we see color. Any suggestions for materials? I LOVE your site. I am getting so many ideas. We are a communication art school.
Dec 03, 2021 @ 16:42:26
Glad you are getting inspired! If you don;t want to get as intricate as the materials listed in the project description, you could simplify it by removing the printing element: Start with the dry-brushed white paint on black paper. Color pencils and Sharpies can work nicely on that, and the chalk pastel smudges add soft pops of color.